
Happy new year everybody!
Well, with a new year comes new resolutions. One of mine was to update my blog religiously every Monday and Thursday....................................yeah.......................well.........................I'm not very big on resolutions anyway. So, I'll say it right here and right now: My goal is to update this bad boy twice a week be it Monday, Wednesday, Saturday, whatever. I'm still going to shoot for Monday's and Thursday's, but, I'm a realist who has no problem admiting my faults and when it comes to faults and strengths, timeliness and consistency definately fall into the "faults" category. Now that we've cleared the air...........let's do this.
I was planning to use this post to give a rundown on my most frequently used gear and how I specifically utilize it, but when going through my camera bag, I stumbled across a cool little accessory that I hadn't used in quite some time and thought some people may find it interesting due to it's conversion capabilities and very low cost. Follow the jump for more.
I never have done any proper macro photography. Mainly because I don't own a proper macro lens. I would love to go out and buy a 100mm f2.8 macro, but there are many other things photography related I want with a higher priority. (plus it's hard to explain to the Mrs. that I need another lens when I've spent $1200+ on lenses in the past year, and she wants new carpet). I do own the macro version of the Sigma 70-200 f2.8 (great lens), but I would not call "macro" it's strongest asset. Add in the fact that most of my photography has been focused on people, and it's not hard to see why macro shots have not been at the top of my to do list.
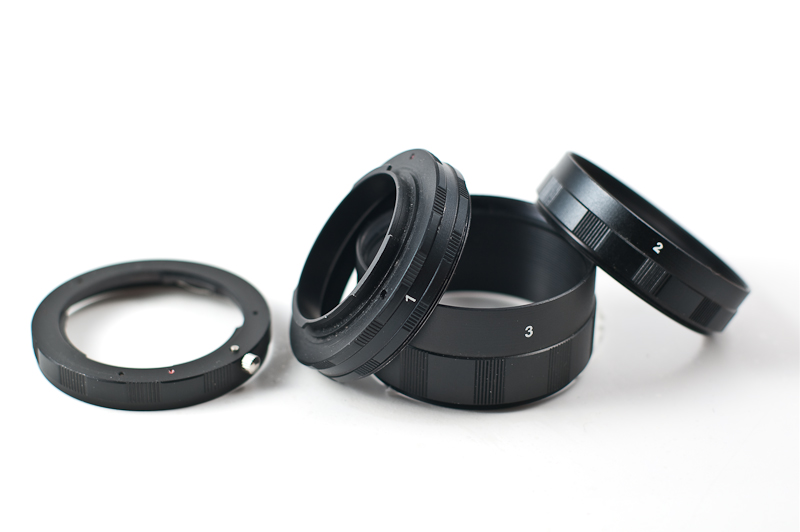
Some of you may know what those circular objects are in the picture above.(you can click on any of the pics to see them bigger) For those that don't, they are called extension tubes (they are also referred to as macro tubes). I bought them a few years ago on ebay for roughly $15 including shipping. They consist of 3 metal tubes that mount in between your lens and camera and can screw together in different combinations depending on how close you want to get to your subject. The great thing about them (besides being dirt cheap) is that they are just hollow tubes, which means that there is no extra glass to go between your lense and camera which can reduce image quality (i.e. teleconverters). You can turn any random lens with good image quality into a bonafide macro lens. The bad thing about these particular tubes is that there are no electrical contacts to transfer information from your lens to your camera, which turns your super high tech digital slr into a full fledged manual camera (but you can handle that right?). I attached these tubes to my 50mm 1.4 lens, and was shocked at how close these things let me focus. See for yourself below.

This image was taken handheld with all three tubes attached to my lens (you can use 1, 2 or all three). I was focusing roughly within a few inches of this key. (The only edit done to this pic was a slight increase in clarity in Light Room, so I'm sure even more detail could be pulled if given a proper run through Photoshop.) The more tubes you use, the closer you can focus. For reference, the image below was taken with just the 50mm lens with no extension tubes. This was the minimum focusing distance while using just the lens.

Yeah, thats my honda civic key attached to a Bentley key ring (it says Bentley on it in case you cant see it, I swear). A man can always dream.
See why I think those cheap metal tubes are so cool? (yeah I know, I'm easily entertained)

Basically the image at the top of this post is where this all started. I actually had some time to relax this past weekend, and when I came across those extension tubes, I thought "what the hey, I'll try to get some of those cool water drop shots I saw on Flickr with these metal tubes." Actually instead of water, I ended up using the last of the whole milk in our fridge (much to my 5 year old daughters dismay). I used two of the 3 extension rings to get the shot above (so all 3 could have gotten me a lot closer). I had never tried to capture images of liquid of any kind, so all things considered, I was pretty proud of myself.
Here is a shot of how I set this up:

I used a homemade macro studio/soft box thingy that someone might use for small product photography. It consists of a cardboard box with all the sides cut out and covered with tracing paper. Inside the box is a piece of white posterboard cut to size. It cost less than $10 to make. You can find specific instructions on how to make one here. The two speedlights have homemade snoots on them (honestly, I'm not sure I really needed them). The light on the left is aimed directly at the cup of milk while the right one is aimed mainly at the background. The next part of this high tech setup consisted of a ziplok baggy tied to the chandelier above the table. I poured some milk into the baggy, poked a hole in the bottom to let the milk drop out every second or so, and started shooting. Timing the shutter release with milk drop was tricky at first, but I got the rythm down pretty quick. The main thing I should have done differently was to place my camera on a tripod, but I could not find mine at the time (okay, I didn't even look that hard, I was just so proud of my fancy ziplok bag engineering and wanted to start shooting).
So there you have it. If you have been wanting to attempt some macro photography, but don't have a lens capable of doing so, these cheap extension tubes could be a possibility for you. They can be a challenge to get the hang of, because you basically have to focus by moving ever so slightly closer to or farther away from your subject, and there is very little room for error, but, as you can see, these cheap metal circles can provide some pretty respectable macro shots when there are no other options available.
Don't forget to try out the DIY macro studio as well. It's well worth the $10 it takes to construct.
Nice, love the snooted lighting set up. I have a DIY light tent as well. Haven't used in awhile. Awesome pic man!
ReplyDelete